2-Story Rooftop HVAC Package Unit Installation / Curb Replacement
Photos
About This Project
Project Video
Video Description
Project Steps
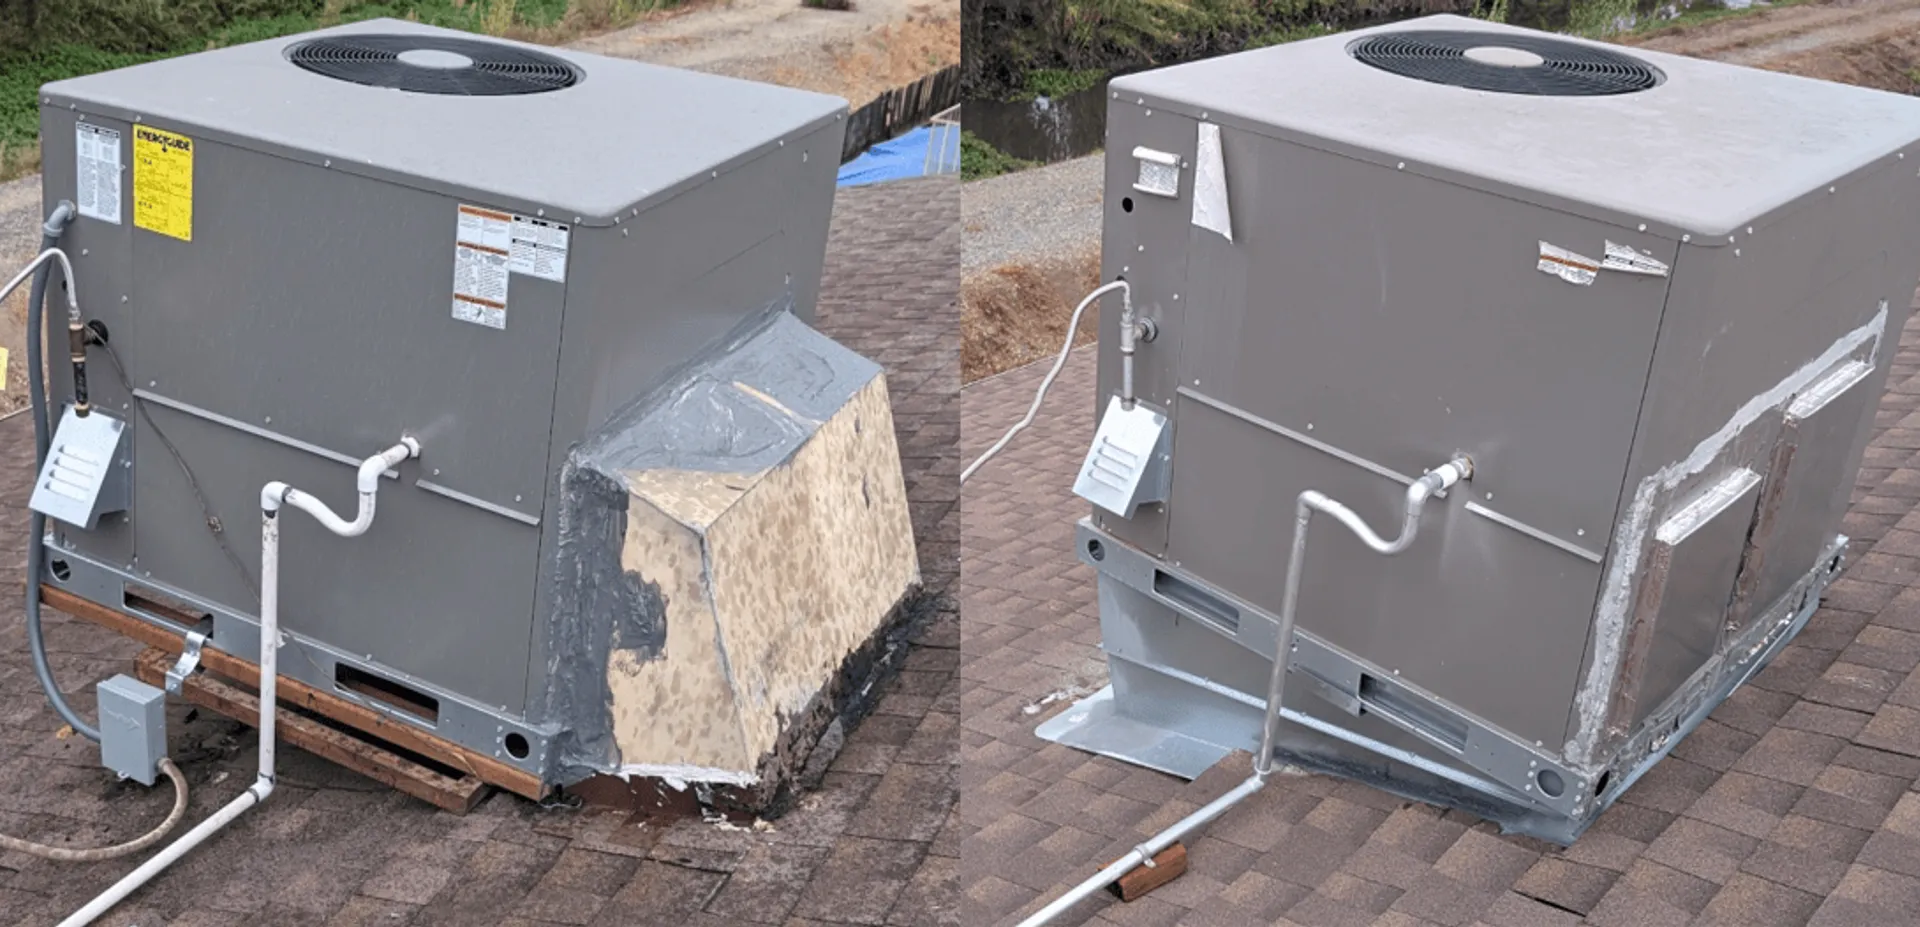
Before and After Pics
Notice the duct moved from the back to the bottom of the HVAC unit
Old elbow/duct on back of new HVAC unit
See the rusted metal stand below the HVAC unit. That stand was from 1978. The HVAC unit was replaced in 2025, but the HVAC contractor was cheap and didn’t replace the stand with a modern curb. Instead, since the new HVAC unit was too large for the stand, he strapped two pressure-treated 2x4s to the stand using a strip of thin metal.
New curb/duct under HVAC unit
The old stand was replaced with a “curb”, which is an enclosed stand. Also, the elbow was removed and the air inlet/outlet on the back of the HVAC unit was closed off with sheet metal because the air now flowed into the building from below the HVAC unit. You’ll also notice the electrical wires (power and thermostat) come out of the roof below the HVAC unit rather than next to it.
Used a crane to lift new curb onto roof
New HVAC curb
Order a curb that is designed for the HVAC unit you have.
Using crane to temporarily move HVAC unit aside
Connect the 4 rope hooks to the 4 holes in the metal base of the HVAC unit. Instruct the crane operator to life the HVAC unit and place it somewhere else.
How the old "elbow" duct from 1979 looked
With the HVAC unit out of the way, we can see the old elbow and ducting that goes into the attic. The left duct is for air to return to the HVAC unit and the right duct is for conditioned air to flow into the building.
Removing the old elbow
Remove the elbow. You may need a pry bar to lift some shingles and a utility knife to cut some sealant connecting the elbow to the shingles.
Cutting the roof sheathing/plywood to fit the new HVAC curb
After dry-fitting the curb on the roof where you want it to go, mark along the inside perimeter and then cut the shingles along the left and right edges of the perimeter. If using a circular saw, adjust the blade cutting depth to avoid cutting deeper than the shingles.
Using a prybar to remove some shingles
Using a pry bar, a row or two of shingles at the top edge and a bit of shingles on the left and right edges.
Drilling hole in roof for electrical cables
Drill a hole in the roof inside the curb so that the electrical cables can come up through the roof from below the HVAC unit rather than next to the unit.
Test electrical
Turn off the circuit breaker to the HVAC unit and check for any voltage. My Lennox 2.5 ton package HVAC unit had two hot wires, red and black, each at 120V, for a total of 240V. The green wire was for ground.
Remove the electrical line cable
Remove the line cable, which supplies electrical power from the circuit breaker box, from the HVAC electrical box.
Remove electrical conduit
Since the Romex line cable will be moved to come up through the roof from under the HVAC unit, we removed the conduit.
Route electrical cable
We then pushed the Romex back into the attic so we could push it through the hole in the roof we made earlier.
Push electrical cable through new hole in roof
Go into the attic so you can push the Romex cable through the new hole in the roof.
Cable coming out through new hole
You can now see the electrical cable is inside the curb
Slide curb into place
Slide the top half of each side of the curb under the shingles and move the curb into its final position.
Level the curb
Place a magnetic torpedo level on one side of the curb, then lift the front of the curb up until the level shows it is level. This is so the HVAC unit will sit level on the curb rather than angled following the slope of the roof.
Drill into curb when it's level
When it’s level, drill a self-tapping screw for metal from the outer side of the curb through the inner side of the curb to hold the outer side in place.
Install brackets
Install the 4 brackets that came with the curb – 2 on the front and one on each side.
Drill hole for electrical and t-stat cable
Drill a 3/4″ diameter hole in the front of the curb for the electrical Romex cable and the t-stat (thermostat) cable to go through.
Buy sheet metal
We needed some sheet metal to connect some ducts and cover some openings. It’s much cheaper to buy a roll at a dedicated HVAC store than the big-box stores like Home Depot, which only sell small sheets. However, some HVAC stores only allow licensed contractors to buy from them.
Bring sheet metal to roof
When going up and down the ladder, make sure to strap the ladder to the building, like an eye hook in the eaves, to keep the ladder from moving. Some city inspectors require this when they come for an inspection.
Cut sheet metal
Cut pieces of sheet metal to connect the duct in the attic to the curb.
Fold sheet metal
Use a flashing folding tool to fold some edges of the sheet metal.
Screw sheet metal to curb
Then screw the cut sheet metal to the curb. Repeat until you’ve connected the duct in the attic to the curb.
Apply HVAC foil sealer duct tape
Apply HVAC foil sealer duct tape at the edges of the sheet metal connections.
Reuse old duct parts, if able
If it helps, you can reuse old duct parts to connect the duct in the attic to the curb. In the following photo, the left opening is where air flows into the building. The right opening is where air flows from the building back into the HVAC unit.
Connect duct to curb
Connecting the duct to the curb can be tricky because there may not be enough slack in flexible ducts and you are sometimes working in tight spaces.
Connect duct to curb
In this case, the contractor had to create a short circular duct to extend the flexible duct that was in the attic.
Connect duct to curb
Hscrewed in the extension piece using self-tapping sheet metal screws.
Apply HVAC tape
He applied HVAC tape to all duct and curb connections.
Apply HVAC sealant
Apply HVAC sealant (Pookie) to all seams and connections. When dry, this sealant becomes very hard.
Apply HVAC sealant
Route electrical line cable
Stick the electrical line cable and load wires (red, black, and green) through the hole previously made in the curb. The load wires connect from the wires in the line cable to the terminals in the HVAC unit.
Screw electrical box to curb
Stick the wires through the hole in the electrical box. Screw the box to the curb.
Cover white wire with black tape
Since both the black and white wires in the line cable are hot (120V), the white wire must be colored black to indicate it is hot. You can cover a portion of the white cable sleeve with black electrical tape.
Connect wires to terminals
Connect the wires to the appropriate terminals in the electrical junction box.
Tape the ends of the load wires and the thermostat wires together
Tape the ends of the load wires and the thermostat wires together to make it easier to access them when the HVAC unit is lowered onto the curb.
Screw the base of the curb into the roof at various places.
Drill hole in HVAC unit for wires
Drill a 3/4″ hole at the bottom of the HVAC unit near where the power and thermostat wires will connect to the unit.
Remove bottom panels
The contractor unscrewed and removed the two panels at the bottom of the HVAC unit since airflow will flow through the bottom rather than the back.
Measure openings
He then measured the openings so he could create some custom panels using sheet metal.
Position the HVAC unit on the new curb
Pulls wires through hole
The contractor pulled the load and thermostat wire through the hole he made in the base of the HVAC unit.
Lower HVAC unit onto curb
The unit was then lowered onto the curb such that the base would sit on the 4 brackets around the top of the curb.
Connect the load wires
He connected the load wires (black, red, and green) to the appropriate terminals.
Connect t-stat wires
He connected the thermostat wires to the corresponding color-coded wires in the HVAC unit.
Connect the gas line to the unit
Apply PVC glue to connect the drip line to the unit
Close gaps with HVAC tape
Put HVAC tape to close the gap between the openings at the bottom of the unit and the duct openings in the roof.
Brush on some HVAC sealant (Pookie) over the tape.
Cut some sheet metal to cover the two openings at the back of the unit
Fold sheet metal corners
Fold the 4 corners of the sheet to fit over the lip of the openings at the back of the unit.
Screw the panels in place
Put HVAC tape around the panels
Put HVAC tape around the panels, but he didn’t apply HVAC sealant (Pookie) over the tape so that maintenance and inspection can easily be done in the future, if needed. (Pookie dries really hard and is hard to remove)
Install shingles
Put new shingles over the area where he had to remove some old shingles.
Cover old hole in roof
Since the old electrical line cable was moved from outside the HVAV unit to under the unit, he covered the old hole in the roof with HVAC tape, which is very sticky tape.
Apply silicone sealant
Apply silicone sealant over screws that could result in roof leaks
Apply silicone sealant
Apply silicone sealant around the electrical box
Apply silicone sealant
Apply sealant in the holes beneath the top layer of shingles where old holes were